Mysql Removing Rows with foreign Keys

Recently have had to become a MySql admin. More writing this for my own notes on how to log in and remove a row from a table. Always make a backup of your database before doing anything like this and only do this if you are fine with the consequences if something goes wrong.

  1. Open an administrative command prompt
  2. CD into C:\Program Files\MySQL\MySQL Server 5.7\bin
  3. Input the command -> mysql -u root -p
  4. at the prompt enter your root password
  5. First get a list of the databases by using the command -> show databases;
  6. Then select the database you need to edit by using the command -> use database-name
  7. Next get a list of the tables in the database with the command -> show tables;
  8. Next get a list of rows in the appropriate table -> select * from db_table_name;
  9. Now to remove a row try the following command -> delete from db_table_name where collum_id = row number;
    1. i.e. delete from bogustable where myid = 8;

In some databases you might get a error that a foreign key exists.

  1.  If this is the case use the following command -> set foreign_key_checks=0;
  2.  Next run the delete command -> delete from db_table_name where collum_id =     row number;
  3.  Now set foreign keys back on by using the following command ->  set                          foreign_key_checks=0;
  4.  check the table to make sure the appropriate row is gone -> select * from db_table_name;
  5. If done then enter the command -> exit


NetApp Snapcenter Protecting the repository database.

Before upgrading Snapcenter 2 or 3 to any other version it is recommended that you back up the SC repository.  The guide lists running a PowerShell command protect-smrepository. When you run this however you usually end up with a bunch of different errors. This is due to the fact there are steps missing from NetApp’s guide.

The first thing missing is there are prerequisites to get it working.

Prerequisites

  • Add the Snapcenter server as a host to the Snapcenter server
    • Select the Windows plug in only. This adds the PowerShell commands needed to make snapshots of the drive you place the repository backups.
  • The SC server must have a Netapp LUN (iSCSI, FCOE, FC) for the backup metadata.
    • VMDK’s will work but seem to not have been tested.

The caveats to using a vmdk are this:

  • Snapcenter vSphere plugin must be added to the vSphere server the VM is under.
  • Datastores are on Netapp either VMFS, NFS and configured for backup by the SC vSphere plugin.
  • Snapshots will be created in that volume so if this is a datastore protecting a large amount of VM’s and you could be close to the 255 limit of snaps you may want to have a dedicate DS for the drive.

Once the prerequisites are done then the SC install guide steps on creating a backup are pretty close. I tested on SC4 and SC3 but should work on SC2. In the guide it has you load the powershell modules. On my system i had no issue running the commands.

  1. Open a PowerShell window as admin.
  2. Run the command open-smconnection
  3. Enter a SC admin credentials when prompted
  4. Run the protect-smrepository command
  5. protect-smrepository -hostname servername.FQDN -path d:\scbackup -schedule @{“scheduletype”=”Daily”;”starttime”=”01/31/2018 10:00 AM”}


The backup does create snapshots in the volume for the VMDK or LUN that you put the backup file on. It seems more likely that the Repository should reside on a NetApp LUN and the snaps are possibly a before backup and after backup as it creates two snaps when the command runs.

Migrating SC Repository

One other note in the SC4 guide it states the command protect-smrepository does this:

  • Moves the SnapCenter repository from one disk to another disk; the destination must be NetApp

It really doesn’t.  In the protect command the path section states where the backup data will go. You will find folders with a xml file relating to the backup and a dump file of the database at the location you specified.

The database if you didn’t create a screenshot during install is located in the hidden folder *:\ProgramData for the drive you installed the program too.

On one server i had upgraded from SC2 to 3 to 3.0.1 and on another i had done a fresh install of SC4. But both were under the ProgramData folder.

  • Upgraded – c:\ProgramData\MySql\MySQL Server 5.x <version number may differ>\Data
  • SC4 or newer – C:\ProgramData\NetApp\SnapCenter\MySQLData\Data

If you do want to move the database use these steps:

  1. Stop the snapcenter service
  2. Stop the MySQL service
  3. Use Robocopy or other preferred method to copy the “Data” folder and files with permissions to your new drive and locale. Leave the other files in their original location.
    • i.e Robocopy c:\source e:\destination /s /sec
  4. The next step is very important as the MYSql service wont start if you get it wrong. You must edit the my.ini* file specifically the datadir path:

datadir=C:/ProgramData/NetApp/SnapCenter/MySQL Data\Data

To reflect where you copied the data files in my case this was the G:\ drive.

datadir=G:/MySQL Server 5.7\Data

*Edit the my.ini in the original install location this should be in the folder above the Data folder.

  1. Start the MySQL service
  2. Start the Snapcenter service
  3. Log into Snapcenter and validate you can see hosts, Resources etc.


NetApp Snapvault Migration between two different CDOT Clusters when using Snapmanager for Exchange

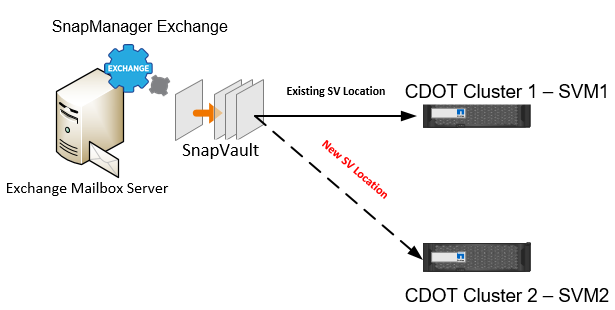
Recently a customer of mine needed additional space on a existing cluster that housed Snapmanager for Exchange (SME) snapvaults. They had a separate CDOT cluster with plenty of space and wanted to migrate the exsiting Snapvault data to the other cluster. While the majority of this article applies to SME it could also be utilized for other snapmanger products and or snapvault migration.

sme-sv-migration

Couple of caveats to this though after migration there is some manual cleanup and administration.

  • SME will show you the older snapvaults that you migrated. However it will not be able to utilize them as the metadata for the backup job will look in the wrong location.
  • Use of the older snapvaults will have to be done manually i.e mount to a Single mailbox restore server using snapdrive or cli on the controller to create clones if your looking for older data etc.

Steps are as follows:

  1. Setup peer relationships if needed between clusters and SVM’s if not already done.
  2. Setup XDP policy on SVM2 to exactly match existing policy on SVM1.
  3. Create destination volumes on Cluster 2 SVM 2 for the vault data type DP– Ensure you create the volumes the same language as the source or snapmirror will not work. The example below shows relationships being created for the DB and Log volume.
    1. vol create -vserver svm2 -volume soexchmbx1_m_drive_vault -aggregate aggr1_node1 -size 20gb -type dp -language C
    2. vol create -vserver svm2 -volume soexchmbx1_l_drive_vault -aggregate aggr1_node1 -size 20gb -type dp -language C
  4. Create snapmirror relationships via command line between the existing vaults SVM1 and the new destination cluster 2 SVM2:
    1. snapmirror create -source-path svm1:soexchmbx1_m_drive -destination-path svm2:soexchmbx1_m_drive_vault -type dp
    2. snapmirror create -source-path svm1:soexchmbx1_m_drive -destination-path svm2:soexchmbx1_m_drive_vault -type dp
  5. Initialize snapmirror either through Netapp OnCommand System Manager or through command line.
  6. Update Snapmirrors on daily basis till ready to cut over.
  7. When ready for cut over Quiesce the existing vault relationships on the local controller CDOT 1 SVM1.
  8. Update the existing DP mirror’s to the new destination SVM2 you will see that you will not have all snaps the last snaps are locked busy these will come over when you run the resynch command further on.
  9. On the new destination controller CDOT 2 SVM2 break the existing DP mirror relationships.
  10. On the source controller CDOT1 SVM1 delete the vault relationship and delete the baseline snap when prompted.
  11. On the new destination controller CDOT2 SVM2 delete the DP mirrors and delete the baseline snap when prompted.
  12. Run the following command to Resynch to new relationships on SVM 2
    1. snapmirror resync -source-path SVM1:soexchmbx1_m_drive -destination-path SVM2:soexchmbx1_m_drive_v2 -type xdp
    2. Check the volumes the busy snaps should now be there
  13. Update Snapdrive transport protocol settings with the SVM for the new vault location also leaving the existing SVM settings.
  14. Run a SME backup job with vault selected and validate it is archived to the second controller
  15. Optional – Mount a earlier DB snapshot to a Single Mailbox Recovery Server and validate you can access exchange mailbox data.

Windows 2012R2 with iSCSI NIC connections resolves to wrong IP address

As a consultant primarily in the Microsoft and storage field I do a lot of work with iSCSI. Recently I have been running into a issue after loading the latest patches from Microsoft where local routing doesn’t behave as expected.

When I went to the local server and tried to ping the server name it would resolve to one of the iSCSI connections and not the proper LAN IP. Digging through the configuration of the servers I found all my settings correct.

  • NIC Binding order
  • TCP/IP settings to only register LAN connection
  • DNS Settings only on LAN connection
  • A DNS lookup would give me the correct IP
  • Pinging from other servers got the correct IP

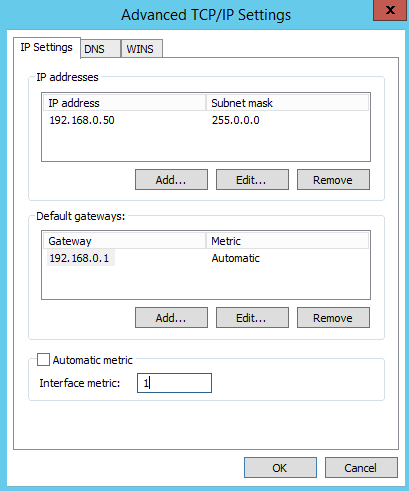
Going deeper I finally saw my problem in the route table all NIC’s had the same metric. The fix to this was to go to the LAN NIC and do properties. Select my IPv4 settings and go to Advanced settings and unselect the Automatic metric and set it as 1.

ip-metric-settings

After making this change a ping of the server locally would resolve correctly.

Windows 2016 Note

In Windows 2016 the ability set binding order has been remove and so you can also see this issue when you have multiple NIC’s ping locally may not give you the correct IP. The resolution is of course as above to change the interface metric’s on the NIC’s.